
Today we are going to build a little module for WordPress which allows site owners to get and manage requests/reports from site visitors/company customers.
If you develop an organization or company web site, this module can manage reports,suggestions etc. by customers.
First let’s answer to this question: Why don’t we provide this feature via email? We can create rich contact form, and customers can send their request to your email via contact form.
Answer: Main advantages of our module on email solution are these:
- It will be more comfortable to keep requests in your Dashboard than keeping them only in email inbox.
- Requests will be kept in mysql table as WordPress custom posts, so in the future you can create new features working with that content.
- You can easily search, filter, edit requests in your dashboard.
- It will have print button which lets you to print requests with one click. No any need to copy-paste-edit request in editor. And with some php functions you can customize a print preview.
We will build our solution for Twentyten theme with default url structure(without Permalinks change).
After understanding structure of the solution you will be able to integrate it with your own theme. So let’s begin.
At first we will build contact form. We do it without captcha, so then you can do it yourself.
Creating new post type for requests:
Go to your theme editor, open functions.php and add this code there:
<?php
register_post_type( 'Requests',
		array(
			'labels' => array(
				'name' => __( 'Reuqest' ),
				'singular_name' => __( 'Requests' )
			),
			'public' => true,
			'has_archive' => true,
			'supports'=>array('custom-fields','title','editor')

		)
	);?>
Save functions.php.
Creating template file for the post type:
Create request.php file in your theme folder and paste given code there:
<?php
/*
Template Name: request
*/
function ppost($name)
{
if (isset($_POST[$name])){return $_POST[$name];}else {return '';}
}

get_header(); ?>

		<div id="container">
			<div id="content" role="main">


 <?php

if (isset($_POST["m_name"])) {

if (ppost('m_name')!='' and ppost('m_midname')!='' and ppost('m_lastname')!=''
and ppost('m_country')!='' and ppost('m_city')!='' and ppost('m_phone')!=''
and  ppost('m_address')!='' and ppost('m_email')!='' and ppost('m_age')!=''
and ppost('m_gender')!='' and ppost('m_type')!='' and ppost('m_subject')!='' and ppost('m_message')!='')
{
$my_postt = array(
     'post_title' => wp_strip_all_tags('You have new request, sender - '.ppost('m_soyad').' '.ppost('m_ad')) ,
     'post_content' => '<br><b>Name:</b> '.ppost('m_name').'<br><b>Middle name:</b> '.ppost('m_midname').'<br><b>Last name:</b> '.ppost('m_lastname').'<br><b>Country:</b> '.ppost('m_country').'<br><b>City/Province:</b> '.ppost('m_city').'<br><b>Phone:</b> '.ppost('m_phone').'<br><b>Address:</b> '.ppost('m_address').'<br><b>E-mail:</b> '.ppost('m_email').'<br><b>Age:</b> '.ppost('m_age').'<br><b>Gender:</b> '.ppost('m_gender').'<br><b>The reason:</b> '.ppost('m_type').'<br><b>Subject:</b> '.ppost('m_subject').'<br><b>Message:</b> '.ppost('m_message'),
     'post_status' => 'private',
     'post_author' => 2,
   'post_type' => 'requests'
  );

  wp_insert_post( $my_postt );

echo '<br><br><b>Your request has been successfully recevied. We will contact you shortly.</b>';
$succ=1;
}
else
{
echo '<br><br><span style="color:red">Error: All fields are required!</span>';
}

}
if(!isset($succ))
{
?>
<style>
input[type="text"], input[type="password"], select {
width: 200px;}
#content tr td {
padding: 6px 4px;
}
 </style>
<h1>Request</span></h1><br>
<form action="" method="post">

<table style="width:460px">
<tr>
<td style="width:190px">
First name(<span style="color:red">*</span>):<br> <input type="text" name="m_name" id="m_name" value="<?php echo ppost('m_name');?>">
 </td>
<td style="width:190px">
Middle name(<span style="color:red">*</span>):<br> <input type="text" name="m_midname" id="m_midname" value="<?php echo ppost('m_midname');?>">
</td>
<td style="width:80px">
Last name(<span style="color:red">*</span>):<br> <input type="text" name="m_lastname" id="m_lastname" value="<?php echo ppost('m_lastname');?>">
</td>
</tr>

<tr>
<td>
Country(<span style="color:red">*</span>):<br> <input type="text" name="m_country" id="m_country" value="Canada" value="<?php echo ppost('m_country');?>">
 </td>
<td>
City/state(<span style="color:red">*</span>):<br> <input type="text" name="m_city" id="m_city" value="<?php echo ppost('m_city');?>">
</td>
<td>
Address:<br> <input type="text" name="m_address" id="m_address" value="<?php echo ppost('m_address');?>">
</td>
</tr>

<tr>
<td>
Phone(<span style="color:red">*</span>):<br> <input type="text" name="m_phone" id="m_phone" value="<?php echo ppost('m_phone');?>">
 </td>
<td colspan="2">
E-Mail(<span style="color:red">*</span>):<br> <input type="text" name="m_email" id="m_email" value="<?php echo ppost('m_email');?>">
</td>

</tr>
<tr>
<td>
Age(<span style="color:red">*</span>):<br> <input type="text" name="m_age" id="m_age" value="<?php echo ppost('m_age');?>">
 </td>
<td colspan="2">

Gender(<span style="color:red">*</span>):<br> <select name="m_gender" id="m_gender"  >
        <option value="M">Male</option>
        <option value="F">Female</option>
        </select>
</td>

</tr>

<tr>
<td>
Report reason(<span style="color:red">*</span>):<br>
<select name="m_type" id="m_type" style="width:145">
            <option value="Suggestion">Suggestion</option>
            <option value="Petition">Petition</option>
            <option value="Appeal">Appeal</option>
      </select>

 </td>
<td colspan="2">
Subject(<span style="color:red">*</span>):<br> <input type="text" name="m_subject" id="m
_subject" value="<?php echo ppost('m_subject');?>">
</td>

</tr>

<tr>
<td colspan="3"><br>
Your message(<span style="color:red">*</span>):<br>
<textarea name="m_message" id="m_message" style="width:70%"><?php echo ppost('m_message');?></textarea>

<br>
<input type="submit" value="Send">
 </td>
</tr>
</table>
</form>
<?php
}?>

			</div><!-- #content -->
		</div><!-- #container -->

<?php get_sidebar(); ?>
<?php get_footer(); ?>
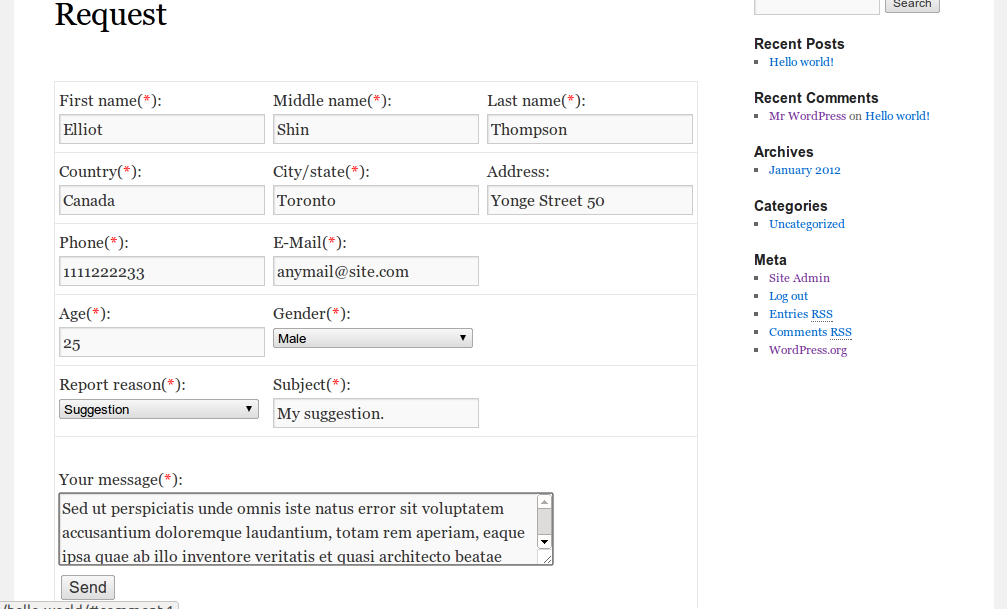
So, we have just created request form.
Creating request view page:
After previous step let’s go to Pages->New, create new page, name it whatever you want, before saving it look at to Sidebar, find Template field and change its value to “request”, then save and publish the page.
User-side is ready.
Adding print feature:
Go to your theme folder, create print.php file and paste this code, then save it:
<?php
/*
Template Name: print
*/
?>
<script>
function prt()
{
document.getElementById("prr").style.visibility="hidden";
window.print();
}
</script>
<?php
if (isset($_GET["rn"]) and $_GET["rn"]>1 )
echo get_option("prt".$_GET["rn"]);
delete_option("prt".$_GET["rn"]);
 ?>
After saving file, go to Pages->new, create new Private page, choose “print” from Sidebar-Template selectbox. Publish it.
After publishing the page, get page_id of published page from url. We will need this ID in next step.
Viewing and managing received request privately:
To finish our solution let’s make some changes in loop-single.php.
Open loop-single.php in editor, then add this code block to the line between “</div><!– .entry-utility –>” and “</div><!– #post-## –>”.
In previous step we asked you to remember page_id of private view/print page. So at 3rd line of given code we are defining it as PRINT_PAGE_ID,
you must change its value from 26 to an ID which you get in previous step.
<?php if (isset($_GET["requests"]))
{
define("PRINT_PAGE_ID",26); // DON'T FORGET TO CHANGE "26" TO YOUR PRINT PAGE ID
$filterettitle=str_replace("Private report: New report by ","Sender name: ",get_the_title());
$randnum=time();
add_option( "prt".$randnum, get_the_date('d.m.Y', '<b>', '</b>').'<br><br><span style="font-weight:bold;font-size:18px">To NAME_OF_YOUR_ORGANIZATION</span>	<br>'.get_the_content(), '', 'yes' );
?>
<script>
function pr()
{
window.frames['myFrame'].focus();
    window.frames['myFrame'].print();
}
</script>
<input type="button" onclick="pr()" value="Print this report">
<iframe style="display:none;border:0" name="myFrame" scrolling="no" id="myFrame" width="170" height="35" src="<?php echo get_bloginfo('url');?>?page_id=<?php echo PRINT_PAGE_ID; ?>&rn=<?php echo $randnum; ?>">
</iframe>
<?php
}?>
Save single.php. And check again for 3rd line, be sure that you have changed the value of PRINT_PAGE_ID constant to your Private Print page ID.
Now you can test our solution.
- Open a Request page created in second step, fill the form and send your first test request.
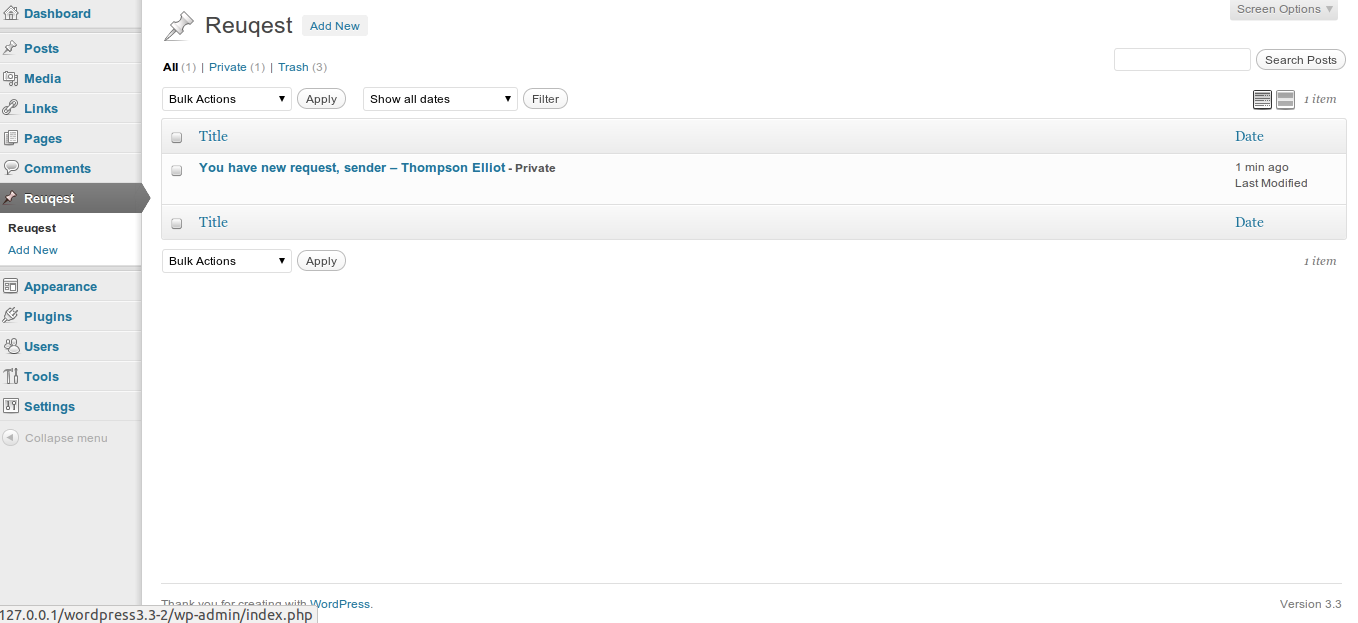
- Go to your dashboard, click Requests link on the left menu. Your received request should be listed there.
Click to View link to view your request privately.
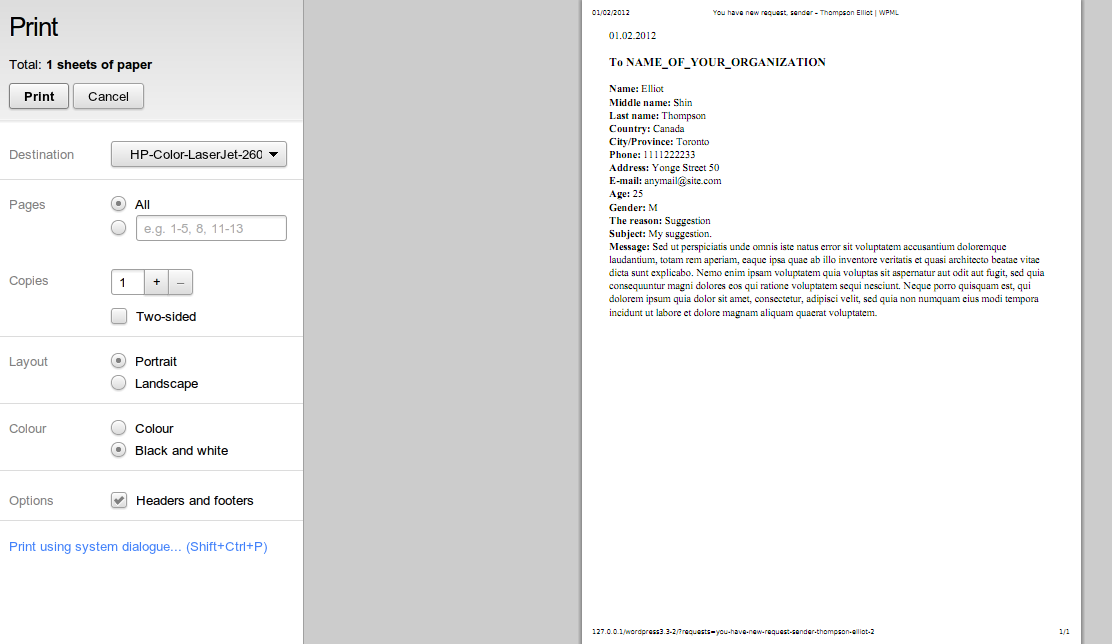
- After clicking view link new page will be opened. Recevived request will appear there.
Above there will be Print button. Click on that button to print a request.
That’s all, good luck. If any question, you can place it as a comment.
1 comment on “Creating a little request management module for WordPress site”
I have set my Permalink to post name how to use page id in function .php then .please mail me on my email -id [email protected]